


How to make a woodshed where the wood will dry out
Freshly cut wood contains about half of the water. If you burn it too soon, a large part of the heat is used to evaporate this water, and tar also forms in the chimney. A good shed will therefore save fuel and money. Read how to make a wood shed with the right dimensions, which technique will allow the construction to be completed in a weekend, and how to store the wood so that it dries out before winter.
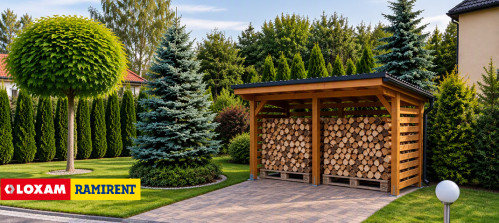
Why wood doesn't belong in the basement and what wet wood will do to the chimney
Logs in the basement or garage look practical, but without air circulation, the wood suffocates rather than dries. The moisture from it gets into the masonry and mold can easily appear in a closed space. How it forms and what to do about it is described in the article How Mold Forms on Walls: 3 Causes and a Permanent Solution . In addition, you can bring the insects that live in it into the house with the wood. Therefore, keep a supply at home for a few days at most, everything else belongs outside.
Damp wood is particularly harmful to the chimney. When burned, the smoke has a low temperature and condenses in the cooler upper part of the chimney. Sticky tar and soot settle on the walls. These reduce the cross-section of the chimney, damage the chimney liner and, in the worst case, can ignite. This is a chimney fire, which usually ends with the intervention of firefighters.
Calorific value is another reason. Wood with a moisture content of around 50% gives about half the heat compared to wood dried below 20%. When drying firewood, it is therefore not only about comfort, but also about how many prm (cubic meters, i.e. 1 m³ of stacked wood, including gaps) you will burn during the winter.
When to buy wood so it has time to dry
The timing of purchase is more important than the shed itself. Softwood dries faster, while hardwood takes up to two years. The following table will help you plan your purchase based on the type of wood.
| Type of wood | Approximate drying time (chopped, under a roof) | Recommended purchase |
| Spruce, pine, fir | 9–12 months | until spring before the heating season |
| Birch, alder, linden | 12 months | at the latest in winter before the season |
| Beech, hornbeam, ash | 18–24 months | two seasons ahead of schedule |
| Oak, acacia | 24 months and more | two to three seasons in advance |
The table shows a simple rule: anyone who heats with hardwood should always have two supplies in the shed. One is for drying, the other is for heating. Split the wood as soon as possible after purchase, because whole logs and cuts dry much more slowly. You can check the moisture content with a cheap moisture meter directly on the freshly split surface.
How much does firewood cost?
Imagine that you need 10 prm of beech for the winter. If you buy logs instead of split wood, you will save approximately €270 (if we consider that hardwood costs €65 per prm in 4 m lengths including VAT and split logs with a length of 33 cm cost €92 per prm, source: price list of the Municipal Forests of Nová Baňa for 2026 ). Then you rent a gasoline chainsaw and a wood splitter for the weekend. Renting both machines for two days will cost you around €160 including VAT, according to the current Ramirent price list, and you will keep most of the savings. In addition, you will prepare the wood to exactly the length that your stove needs.
How to calculate the dimensions of a shed according to consumption
Before you start drawing, find out how many cubic meters of wood you will burn per season. A family house heated only with wood will typically use 5-10 cubic meters, a fireplace for heating 3-5 cubic meters. It depends on the insulation of the building, climatic conditions and heating method. Then calculate the length of the shelter using the formula: length = volume in cubic meters ÷ (stack height × stack depth) .
| Consumption per season | Approximate length of the shelter (1 wood supply) | Approximate length of the shelter (2 wood supplies) |
| 4 months | 2-3 meters | 5.5m |
| 6 months | 3-4 meters | 7.5m |
| 8 pm | 4-5m | 9.5m |
| 10 pm and more | individually | individually |
The calculation assumes a stack height of 1.6 m and a depth of 1 m.
If you end up with a building that is too long on your property with two supplies, you don't need to increase it. It's better to build two separate sections or one deeper shed with a dividing wall. Dividing also has a practical advantage, because you know exactly which part of the wood is already dry.
How to make a wood shed step by step
For most gardens, a simple structure with 4 to 6 wooden posts (for example, 10 × 10 cm beams), a hipped roof, and ventilated walls is sufficient. The procedure for such a construction is always the same.
Choosing the right place
The first step is to choose a suitable location. The shelter should be located in a dry and slightly elevated area. This will avoid rainwater accumulating under the structure.
Also, think about easy access during the winter. It is not practical to carry wood dozens of meters across snowy terrain.
1. Column footings
A footing is a concrete block in the ground on which a post stands. To prevent frost from lifting it, it should extend to a frost-free depth, usually 80 cm in Slovakia. A pit with a diameter of 25 cm and a depth of 80 cm will be filled with about 40 liters of concrete, so you need about a quarter of a cubic meter for six footings. Before drilling, check where the water, electricity or gas pipes are. When doing earthworks in the garden, these are the most common damaged networks.
2. Anchoring the posts
Do not cast the wooden post directly into the concrete, as the bottom will rot quickly. Insert a U- or H-shaped steel anchor foot into the fresh foot, which will raise the post 5–10 cm above the ground. If you are adding the structure to an existing concrete surface or wall, attach the anchors to the drilled holes with a chemical or mechanical anchor.
3. Roof
A pitched roof with a slope of at least 10 to 15° works best, oriented so that water runs backwards, rather than onto the wood pile. The roof overhang is more important than it seems. With 30–50 cm at the front and sides, slanting rain will hardly reach the wood. Trapezoidal sheet metal or OSB board with asphalt shingles is sufficient as a covering.
4. Ventilation and flooring
Wood needs wind, not walls. Cover the walls with battens with 2–3 cm gaps and leave the front side open, ideally facing south or southwest. Make the floor as a grid of prisms or pallets 10–15 cm above the ground, preferably on a gravel bed. This way the wood will not absorb water from below.
Technology that speeds up construction
You don't have to drill dozens of holes for a shed like you do for a fence, but each hole needs to be deep and wide enough for the concrete. How a ground auger saves time and how to choose between a one-man and two-man model is described in detail in the article Are you building a fence? Hand digging is a thing of the past - this is how a ground auger will save you 2 days of work . For a small shed, a one-man auger is usually enough. You can drill six holes in the morning and concrete them in the afternoon.
A concrete mixer is worth it for a quarter of a cubic meter of concrete. When mixing by hand, it is difficult to maintain the same consistency in all the footings. The correct ratio of ingredients and the care of fresh concrete can be found in the manual Concreting without errors: A guide for foundations, terraces and walkways . A hammer drill from the Drills and hammer drills category will be used to make holes for anchors in concrete. You can cut prisms and battens with a circular saw from the range of circular, straight and cutting saws .
Once the shed is finished, it's time to cut the wood itself. A gasoline chainsaw is used to cut the logs. When working with it, wear hearing protection, glasses, gloves, sturdy shoes, and protective clothing. Always use the wood splitter with both hands on the control levers and have the second person not stand near the log while working.
How to store wood so it dries quickly
Even a good shelter won't help if you store the wood incorrectly. How to store wood correctly? Store the logs with the bark facing up so that any water can drain, and leave a 10–15 cm gap between the stack and the back wall for air circulation. Keep the same distance when storing them against the wall of the house. This will prevent moisture from building up on the facade.
A safe stack height is 1.5 to 1.8 m. If the stack is higher, the logs will easily fall apart when removed, especially when the wood is already dry and lighter. Strengthen the ends of the stack by cross-stacking, i.e. alternating layers lengthwise and crosswise. This will create stable pillars. If you are storing the wood outside without a shelter, cover only the top. A tarpaulin that covers the entire stack will trap moisture and the wood underneath will start to mold.
If you are thinking about how to store wood from two seasons, you should separate dry and fresh wood. Store the dry wood closer to the entrance and the freshly chopped wood towards the back or in the other part of the shed. This way, in winter, you won't accidentally take wood that hasn't dried for a year.
What solutions can you find at Ramirenta?
For building a shed and processing firewood, you will find equipment in three categories. The Garden Equipment category includes earth augers, chainsaws and a wood splitter. The Small Machinery category offers concrete mixers and the Hand Tools category includes hammer drills, screwdrivers and circular saws for wooden construction.
For a shed and wood for one winter, buying your own machines is usually not worth it. Renting for a day or weekend is cheaper for a one-time job. Heavier machines, such as a wood splitter weighing almost 300 kg, can be delivered to you by Ramirent through the Equipment Transport service. We present other machines for autumn garden work in the article Autumn Garden Cleaning: 5 Machines That Save Time .
Frequently asked questions
Chopped softwood, such as spruce, will dry out under shelter in 9–12 months. Hardwood, such as beech or hornbeam, needs 18–24 months, and oak even longer. The wood is ready for heating when its moisture content is below 20%.
Yes, but leave a 10–15 cm gap between the stack and the facade to allow air to flow and prevent moisture from entering the masonry. Slope the roof of the shed away from the house. Before building, check with the municipal office whether the construction is subject to notification.
Under a roof, this doesn't really matter, the airflow is what matters. On the top layer and in open-topped stacks, however, it's better to stack the bark face up. The bark acts as a small roof and rainwater runs off the wood.
The requirements for a permit or notification for a shelter depend on its size, construction, method of foundation and location on the land. Legislation may change and individual cases are assessed individually. Therefore, we recommend checking the current conditions with the relevant building authority before construction.
CONCLUSION
A woodshed with ventilated walls, a roof overhang, and a floor above ground will save fuel and a chimney. You can drill the footings with an earth auger in a morning and process the logs with a saw and splitter in one weekend.
See earth augers, saws and a wood splitter for rent in the Garden Equipment category . For concreting footings, you can find mixers in the Small Mechanization category .
